With not a lot of riding occurring at the moment, I thought I’d give you a glimpse behind the scenes here, to peek at the kind of computer kit I use to run this blog and produce my videos. It may not be the best video editing rig you can buy, but it will hopefully give you an insight into something that can produce good results without breaking the bank. Be warned, this gets a bit geeky!
MacBook Pro
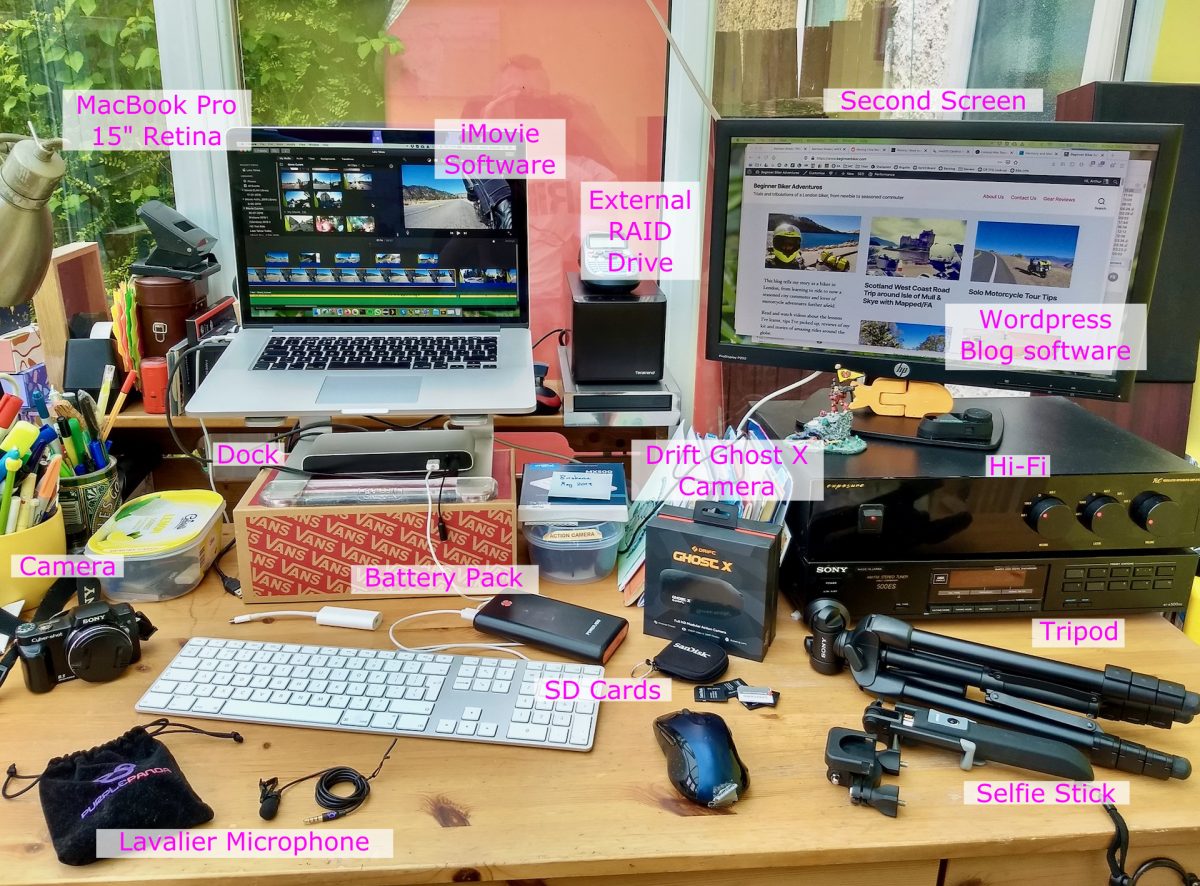
I have a preference for Macs, simply because they’re generally well-designed, last well and have good migration and recovery features. I’m currently running a Mid-2014 15″ MacBook Pro Retina, with 16GB RAM, 250GB SSD drive and 2.2Ghz Intel Quad-Core i7 processor. Now before you cry ‘But boy they’re super expensive!’, I picked MacBook up refurbished from Music Magpie in November 2019 for £650 (but did have to buy a power supply at £80 on top). At the time of writing a similar spec brand, a new Windows laptop will set you back over a grand.
I’d recommend the Retina display, as its high resolution is perfect for inspecting video in a small preview pane. But note, RAM is not upgradeable on recent Retina Macs, so do get one with 16GB already in it. I also went for the fast Intel Core i7 chip, to help blitz through video rendering and processing. Overall, it’s plenty fast enough to work on a long 1080p video, and possibly 4k video at a push.
Cameras
On the bike, I currently use a Drift Ghost X action camera. A good quality 1080p camera priced at about £120. It has great battery life (4-5hrs), is waterproof, has a slimline profile and a rotatable lens perfect for helmet mounting. You can also plug an external mic into it via a supplied USB adaptor.
For other photography, I either use my old Moto G5 Plus mobile (which had the best camera reviews of all cheap phones at the time), or a Sony Cyber-Shot DSC-H10 digital camera, which is really getting on a bit but has a great Carl-Zeiss lens with 10x optical zoom in a nice small form factor.
Do also consider picking a tripod for setting up static shots and a selfie stick for all your Insta’ shenanigans. You can also get phone clamps to bolt to the top of a standard camera tripod which can be useful too. For the Drift, I have a thumbscrew clamp and loads of mounting plates to attach to whatever bike I’m riding (or renting). To reuse Drift mounts, get yourself a reel of 3M VHB tape. I’d also advise buying a stack of SD cards (label them up one per day of adventure planned) and a good battery pack for recharging on the road.
Microphone
If you want to do any kind of voice-over, you really need to get a proper Lavalier microphone, but you don’t need to spend a fortune. I have a Purple Panda Mic Kit (~£50), which although it looks like it’s come from Lovehoney, is good quality and includes all the adaptors you need to mic up your Drift, phone or Mac. Unfortunately, this mic appears to be less readily available in the UK these days, so I’m open to suggested alternatives.
Software
Apple iMovie
I’ve used the Apple iMovie app for all my video editing. It’s free with recent Macs and capable enough for most things, I’ve only found it limiting when wanting to layer multiple videos or sprites. If you want to go more professional, you could look at Adobe Premiere Pro (£20/month) or Apple Final Cut Pro (£300), both heavyweight software used throughout the video editing industry. However, I’ve never had the inclination to spend that kind of dosh.
Apple Photos
Free with any Mac, a straightforward app to organise photos from rides, adventures or general product reviews or howtos. I can perform basic touch up, enhancement and cropping, such that I rarely feel the need to use anything else. However, if you have a proper DLSR camera and want more control, working with RAW photo files etc, you might need to look elsewhere.
GIMP (GNU Image Manipulation Program)
Being a cheapskate, I use GIMP as a free open-source alternative to Photoshop (which costs £20/month). It’s my go-to app when I need to do more edits than I can in Apple Photos. I find it plenty powerful enough for most stuff, ideal for multi-layer compositing or working with transparency for still overlays needed in videos. GIMP is a free download for Linux, Windows or Mac, with recent versions much better integrated into the Mac OS.
WordPress
This blog is a fairly standard WordPress installation. A great, simple-to-use blogging application that is the de facto standard for blogging. It’s readily available for free at WordPress.com (albeit with some commercial limitations) or from almost all web-hosting providers, with basic setups costing as little as £3-4 / month. Perfect to start out small, then upgrade later when you become an internet sensation and need to handle more traffic (although, I’m still waiting for that one…)
Extra Computer Kit
The other kit I have on my rig is not 100% essential but is very useful.
An external USB3 RAID drive box filled with two 1TB drives striped (RAID0) to double speed, which is my main video working drive. The MacBook only has a smallish 250GB SSD drive, so to manage the large volume of video I use this very fast external drive. I picked up a Silverstone/Teratrend SST-TS231U empty drive box second-hand on eBay for £40, then just shoved some standard 3.5″ drives into it (1TB drives under £40 each these days).
A second screen is always very handy, as you invariable have countless windows and apps open. Prices vary depending on quality, resolution etc, but £50-100 will buy you something basic that’ll do the job. As I’m using the MacBook Retina display for critical visual work, the second screen doesn’t need to be super posh.
A Thunderbolt or USB dock is a handy way to plug everything in, so I can quickly walk away with my MacBook without needing to unplug loads of cables. It also avoids needing a dongle for the ethernet cable and I find it great to swap my work Dell laptop into this setup for my day job. These docks can get pricey (~£250), but I picked this older Elgato Thunderbolt 2 second-hand on eBay for £100. The latest Elgato Thunderbolt 3 dock uses newer USB-C connections which can also deliver power to your laptop but aren’t compatible with my older MacBook. Check what connections your laptop has to work out what’s best for you here. OWC and Belkin also make very good docks.
FYI the Apple Thunderbolt 2 to USB-C adaptor works a treat to plug my Dell work laptop into this dock, as the Dell has a ThunderBolt compatible USB-C socket.
Backup and Archiving
When working with video you all too quickly find yourself with tonnes of footage you want to keep hold of and huge storage and backup nightmare. My solution was a big server in the loft filled with many huge drives.

There are many approaches to backups, I’d just recommend you have something in place in case a drive dies or your MacBook gets stolen
The server runs Enterprise Linux Centos 8, which is guaranteed to have security updates for 6 years odd, unlike other Linux distributions that expect you to upgrade everything every few months. The server itself is home-built, based on a low-power Intel Atom board with 4TB of disks in a mirrored setup (RAID1), i.e. everything is written to two disks, mirror images of one another, in case one fails. I have Gigabit Ethernet wiring around the house (with a second-hand 3Com Baseline Managed Switch 2924) to ensure fast file transfer too.
This server acts as a network file share to store older footage and video projects and hosts TimeMachine backups for the household’s MacBooks. I also shove all our music collection on it, hosted in a Plex server (which is awesome BTW) and it hosts a Minecraft server for the kids (just for kids, honest!)
The server regularly backups to an external USB drive and selected current data to BackBlaze B2 cloud storage. For finished videos and projects, regular cloud backups don’t make sense as the data shouldn’t change, so I have scripted anything added to an ‘Archive’ file share to be copied once to BackBlaze B2 cloud storage. Don’t underestimate the time it takes to upload and archive finished video to cloud storage over household broadband!
There are many approaches to backups, I’d just recommend you have something in place in case a drive dies or your MacBook gets stolen so you can recover. Then consider a separate plan to archive finished work for future reference.
Conclusion
I hope you found this peek behind the scenes at Beginner Biker Adventures interesting. Maybe it sparked some ideas, maybe you have better suggestions. I’d love to hear from you and find out more about the computer rig you’ve built.